Installing Intellij IDEA on Mac and Ubuntu
It has been a year since I moved my professional and community development projects from Netbeans to IntelliJ IDEA. Netbeans is still a great IDE and I recommend it over any other open source alternative, but the productivity brought by IntelliJ is so great that the time I’ve saved using this IDE already paid off.
I have IntelliJ installed at home and at the office. It’s the same license but the deal is: you can install it in several computers but use one installation at a time. I use Mac and Ubuntu at home and my experience installing IntelliJ in those platforms was the following:
Installing on Mac
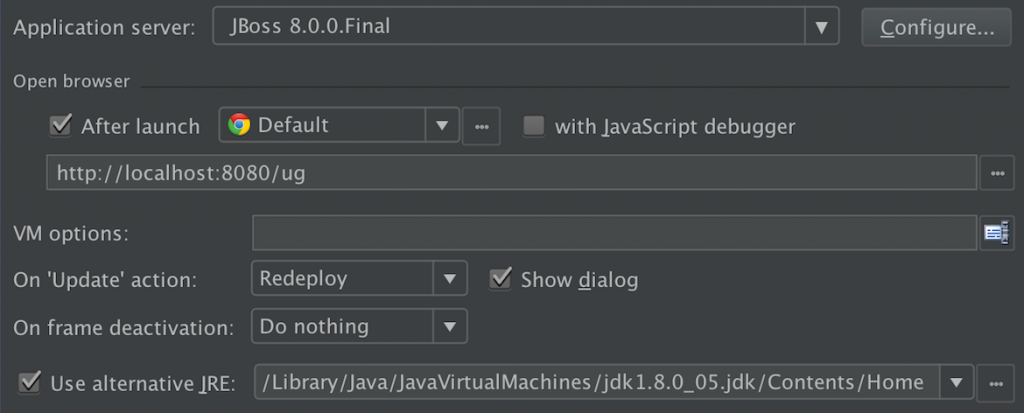
I’m not really going into step by step here. IntelliJ is pretty easy to install on Mac, but I had a problem with the JDK and I’m going to focus on that now. IntelliJ uses the JDK distributed by Apple by default, which is a JDK 6 implementation. Well, this is not a big deal, since we can install the most recent JDK and configure our projects in the IDE to use it instead. But, for some unexplained reason, I couldn’t configure the IDE to start the application server in a JDK different from the one used by IntelliJ (JDK 6). In the image below, you can see I’ve configured JDK 8 to run WildFly, which requires JDK 7 or superior, but it didn’t work.
So, I had to change the JDK used by the IDE. For that, I:
- closed IntelliJ;
- went to the folder where all applications are installed (/Applications) and selected the file “IntelliJ IDEA ##.app”;
- accessed the context menu (mouse click with two fingers) and selected “Show Package Contents”;
- opened the file “/Contents/Info.plist” and
- located the JVMVersion to change its correspondent value to 1.8*.
After this configuration, I could finally make IntelliJ run Wildfly.
Installing on Ubuntu
The installation on Linux is traditionally more complicated. I wonder why people complain about the low number of Linux desktop users. 🙂 The IntelliJ IDEA download page mentions only two steps:
- unpack the “ideaIU-XX.Y.Z.tar.gz” file using the command “tar xfz ideaIU-XX.Y.Z.tar.gz” and
- run “idea.sh” from the bin subdirectory.
However, this instructions don’t deliver IntelliJ as delivered in other platforms. People don’t go to the installation folder and execute the file idea.sh. They either create a desktop icon or add the bin directory to the path, but these steps are missing. So, in my understanding, the installation is not completed. To launch IntelliJ from anywhere in the command prompt:
Become the root user:
sudo -i
Move the unpacked folder to “/opt/idea”:
mv ideaIC-XX.Y.Z /opt/idea
Edit the file .bashrc:
gedit ~/.bashrc
Add the following line to the end of the file:
export PATH=/opt/idea/bin:$PATH
Log out and log in to the change take effect.
To add the launcher icon on the desktop, there is a soft and a hard way.
The Soft Way
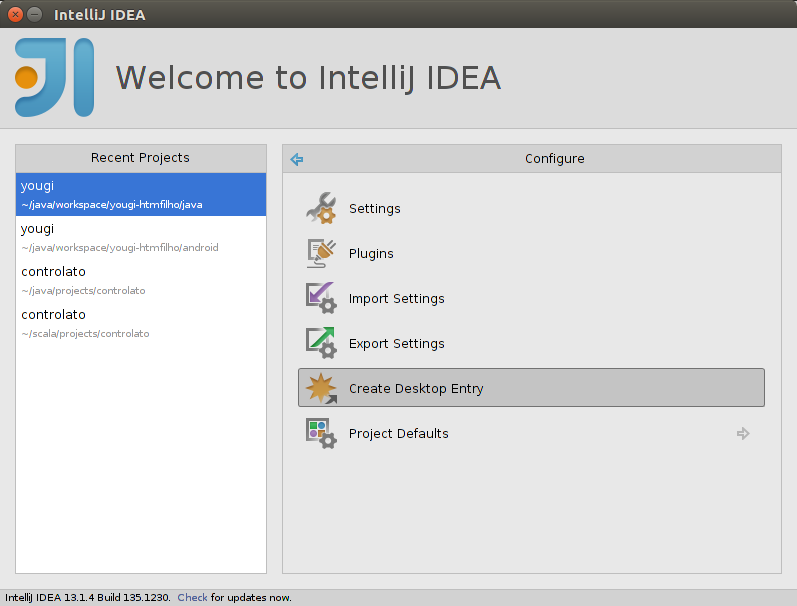
Fortunately, IntelliJ can help you once you run it for the first time. In the welcome window, select “Configure”:

And then select “Create Desktop Entry”.
That’s it!
The Hard Way
As a good Linux user, you may prefer doing it the hard way, as follows:
Create a desktop file:
cd /opt/idea
gedit idea.desktop
Copy the content bellow to the file:
[Desktop Entry]
Name=IntelliJ IDEA
Type=Application
Exec=idea.sh
Terminal=false
Icon=idea
Comment=Integrated Development Environment
NoDisplay=false
Categories=Development;IDE;
Name[en]=IntelliJ IDEA
Install the desktop file:
desktop-file-install idea.desktop
Create a symlink:
cd /usr/local/bin
ln -s /opt/idea/bin/idea.sh /usr/local/bin/idea.sh
Finally, display the idea icon in dash:
cp /opt/idea/bin/idea.png /usr/share/pixmaps/idea.png
At this point, you will finally feel IntelliJ as an application, integrated with the desktop and always ready to be executed.
Recent Posts
Can We Trust Marathon Pacers?
Introducing LibRunner
Clojure Books in the Toronto Public Library

Once Upon a Time in Russia

FHIR: A Standard For Healthcare Data Interoperability

First Release of CSVSource

Astonishing Carl Sagan's Predictions Published in 1995

Making a Configurable Go App

Dealing With Pressure Outside of the Workplace

Reacting to File Changes Using the Observer Design Pattern in Go

Provisioning Azure Functions Using Terraform

Taking Advantage of the Adapter Design Pattern

Applying The Adapter Design Pattern To Decouple Libraries From Go Apps

Using Goroutines to Search Prices in Parallel
Applying the Strategy Pattern to Get Prices from Different Sources in Go